
Hi folks, It’s me again. I am here to get you started with your very own hardware lab. Are you as excited as I am? Great! I hope your hunt for used equipment was successful (feel free to comment on what you could buy for your lab).
But let’s get started. Here is a list of things I hope you could aquire:
- Used gear (whatever makes you happy)
- A computer
- A way to communicate via console with your device, e.g.
- At least one RS-232 serial to usb adapter (Juniper devices oftentimes have mini-USB for configuration, however you first have to activate this port using a serial adapter)
- At least one console cable for your device of choice
- Some ethernet cables to create your first topology
- A way to power everything (some euqipment is +48V, some needs special power cables uncommon to normal users)
- A manual for each device type
- Time
My setup
In order to make things easier for you to understand, I will create a little diagram depicting my setup. But note, that your’s might be very different. So try to understand the key aspects in order to use them on your very own hardware.
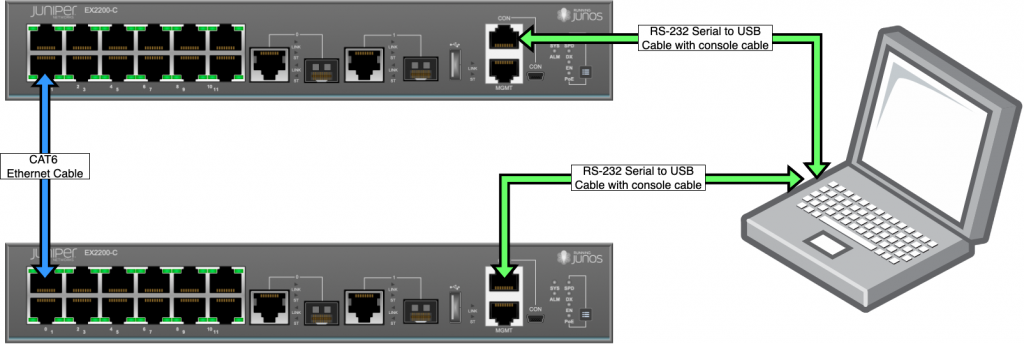
Remember, this is just an example of connecting these two devices to my computer. I will later show you how to connect to those devices using ssh and the build in MGMT ethernet port. This way, you only need one serial connection for the initial configuration. This is also a lot better because configuring over SSH is a lot faster.
Connecting to your devices
Connecting to your devices may vary on what you bought. In our example, we use a serial connection to connect to the EX devices. On Windows, I would suggest to use PuTTY, which is capable of connecting to COM ports as well as over SSH. As I am a Mac user, I will use the terminal program screen to do so.
First, I check what my serial device is called:
johannes@MAC: ls /dev/ | grep USB
tty.USBserial-84678
After that, I will use the screen utility to open a connection to this device. There is one thing that you need to know, before connecting via a serial connection to your device, which is the connection settings. Most of these settings will be default, the one thing that is different amongst vendors is the baud rate. The data rate at which the devices can communicate. As the serial connection only uses two wires for communication, namely RX and TX, it needs a predefined speed to understand the data that is comming from the device.
After checking my manual, I know that my baud rate is 9600 bit/s. So I start a screen session with this speed and press enter to check, whether I can talk to the device.
johannes@MAC: screen /dec/tty.USBserial-84678 9600

Sat Aug 17 08:58:20 UTC 2024

Amnesiac (ttyu0)

login: root

--- JUNOS 12.3R9.4 built 2015-02-12 11:08:08 UTC

root@%
root@% cli
root>
What to do first
The first thing you definately have to do is to check, whether the device holds any residual configuration from the previous owner. Although most companies are only allowed to sell these devices after a factory reset, it happens that this step gets missing. Nevertheless, I would always advise you to do a factory reset. Better save than sorry.
I won’t go into detail on how to do this on every platform out there, so please check the manual of your device (or consult the manufacturers knowledgebase) on how to perform a factory reset.
In my case, as I got presented with the word Amnesiac, the EX should be factory reset. But I will erase it anyway.
root> request system zeroize
warning: System will be rebooted and may not boot without configuration
Erase all data, including configuration and log files? [yes,no] (no) yes

warning: ipsec-key-management subsystem not running - not needed by configuration.
warning: zeroizing re0
...

Amnesiac (ttyu0)

login: root

--- JUNOS 12.3R9.4 built 2015-02-12 11:08:08 UTC

root@%
root@% cli
root>
A blank canvas
So, presume you did all these steps and you now look at an empty prompt on your device. What to do next? As I previously said, I would activate SSH and the MGMT port on my EX in order to manage it via SSH. So let me show you the configuration needed for this to work.
root> edit
Entering configuration mode

[edit]
root# set system root-authentication plain-text-password
New password:
Retype new password:

[edit]
root# set system services ssh

[edit]
root# set interfaces fxp0 unit 0 family inet address 192.168.69.21/24

[edit]
root# set routing-options static route 0.0.0.0/0 next-hop 192.168.69.1

[edit]
root# set system login user master class super-user authentication plain-text-password
New password:
Retype new password:

[edit]
root# commit and-quit
Generating RSA2 key /etc/ssh/ssh_host_rsa_key
Generating public/private rsa key pair.
...
commit complete
Exiting configuration mode

root>
Here is a quick rundown of what each of these commands is doing (I go through them line by line):
- Via edit, we enter the configuration mode.
- Now we need to set a password for the root user. Otherwise, we will not be able to commit our changes.
- We enable the SSH service.
- We configure our MGMT interface with the IP-address 192.168.69.21/24 (nice). Please use an IP-address from your network which is not used for DHCP. In my case, I used a different network without DHCP, so this address is free to use.
- We create a static default route to our gateway.
- We create the user master as a super-user and set the password.
- We commit these changes. This will also create the required SSH keys.
Don’t forget to initiate your other devices as well.
Connecting via SSH
So presume you did the same (or similar things) as described in the last step. What is needed for you to SSH into the device? We need to do a quick recabling after we have done this on both of our device.
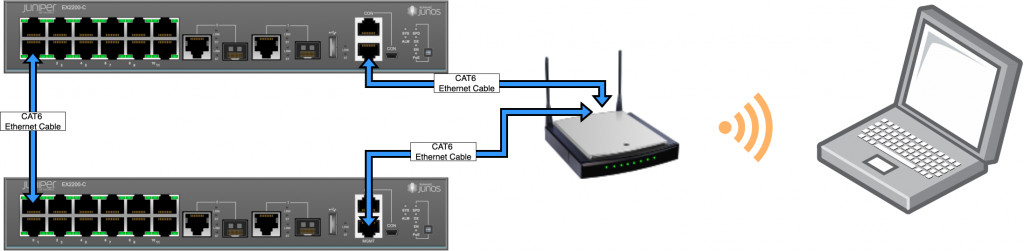
As you can see, I connected both MGMT interfaces to our router. I am also connected to the same router via WiFi.
The only thing left to do is to try to SSH into our system (normally, you would be asked to accept the host key, but I already logged into the device so it did not ask me again).
johannes@MAC:~ $ ssh 192.168.69.21 -lmaster
master@192.168.69.5's password:

master@root>
After checking this for my other EX, I continued to configure my example scenario.
Hello World.conf
Well, almost. My Hello World equivalent will be to configure a VLAN on both devices, add an IRB (that’s integrated routing and bridging) interface to them and try issuing a ping. Here is a list of the commands:
## On EX 1
set interfaces ge-0/0/1 unit 0 family ethernet-switching port-mode access vlan members TEST
set intefaces vlan unit 100 family inet address 10.0.0.1/30
set vlans TEST vlan-id 100
set vlans TEST l3-interface vlan.100

## On EX 2
set interfaces ge-0/0/0 unit 0 family ethernet-switching port-mode access vlan members TEST
set intefaces vlan unit 100 family inet address 10.0.0.2/30
set vlans TEST vlan-id 100
set vlans TEST l3-interface vlan.100
I committed the configuration on both devices and then issued the ping 10.0.0.2 command on EX 1. Here is my output:
master@root> ping 10.0.0.2
PING 10.0.0.2 (10.0.0.2): 56 data bytes
64 bytes from 10.0.0.2: icmp_seq=0 ttl=64 time=3.028 ms
64 bytes from 10.0.0.2: icmp_seq=1 ttl=64 time=3.751 ms
^C
--- 10.0.0.2 ping statistics ---
2 packets transmitted, 2 packets received, 0% packet loss
round-trip min/avg/max/stddev = 3.028/3.389/3.751/0.361 ms

root>
What to do next?
Great, you now have a working homelab with real hardware. How cool is that?
You might ask yourself, what you should be doing next. My recommendations would be to get to know your devices. Test protocols, build topologies, configure until the device restarts because there is no memory left and you need bigger devices. The cool thing about homelabbing is, that you can lab whatever you want. No one hinders you from building 10 spanning tree topologys. But please don’t, poor devices.
Alright folks, that’s all for this post. More on this topic in part 3. I hope you enjoyed it and if you’ve got any questions or comments, please feel free to post them below. Until next time!