
My folks, it is time to put the MXimal Performance Lab (or MPL for short) to good use. Let’s get started with your first BGP Sessions and push some packets through.
As we are building the BGP sessions, we will learn about some of the mechanisms used in BGP. But let’s start with a really simple example.
First Babysteps
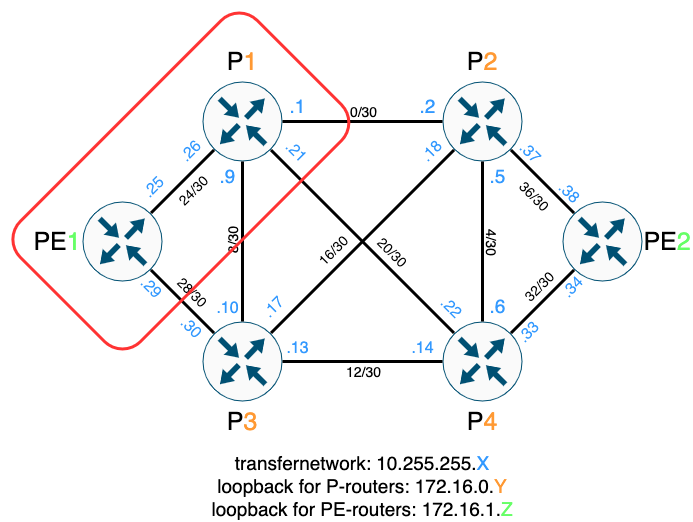
You can see the topology of my MPL as well as two routers being circled. Those routers both have a loopback IP-address as well as a /30 network interconnecting them both:
- PE1 loopback: 172.16.1.1
- P1 loopback: 172.16.0.1
- Transfernetwork: 10.255.255.24/30
Let’s assume, I want to ping P1’s loopback address from PE1.
master@PE1.mpl> ping 172.16.0.1
PING 172.16.0.1 (172.16.0.1): 56 data bytes
^C
--- 172.16.0.1 ping statistics ---
5 packets transmitted, 0 packets received, 100% packet loss

master@PE1.mpl>
Without any additional configuration (other than the basic configuration you can see on the MXimal Performance Lab page), we cannot ping the devices. So how can we solve this issue? With a static route, of course. I would need to tell PE1 that it needs to go to 10.255.255.26 to reach the address 172.16.0.1 and P1 that it needs to go to 10.255.255.25 to reach the address 172.16.1.1. But this is somewhat inconvenient, because we have to always keep track on where we will need to route traffic. So using a dynamic routing protocol would be the better solution. Coincidentally, BGP can solve our issues without any problems!
But how? BGP is a session based routing protocol, which uses TCP Port 179 to interchange its BGP message. There are only a few types of messages, I will shortly explain them:
- Open Message: This is used to establish the BGP Session.
- Update Message: This message type is used to inform our peer about changes in our network.
- Keepalive Message: This message is periodically sent in order to check whether our peer is still alive. If three keepalive messages are not received in a row (3x keepalive time = hold time), a session is considered dead and its corresponding routes are discarded.
- Notification Message: If an error occurs, these messages are sent to indicate that the BGP session needs to get brought down.
Let’s start with just creating a simple BGP session. All that is needed for this is the Open Message and a few attributes.
- BGP Version number: currently version 4. Both peers have to match the version number.
- AS number: Each router becomes an autonomous system number. You then specify, what number your peer uses. This number must match when receiving the open message or the session will not get enabled. This also decides, whether the session is an iBGP or eBGP session (more on that in a bit).
- Hold time: This time signals, how long the session will last without any keepalives until it is brought down. They can mismatch, however the lowest value of both is always used. This in turn determines, that every (hold time / 3) seconds, a keepalive message will be sent.
- BGP router ID: this ID is used to identify BGP routes with its originator. It is almost always represented in the format of an IPv4 address. This, as well as the AS number, is used to prevent routing loops.
So for our example, lets define the following variables:
- PE1:
- AS: 65000
- Hold time: 180 seconds (this is the default, so we do not need to configure it)
- Router ID: 172.16.1.1
- P1:
- AS: 65001
- Hold time: 180 seconds (this is the default, so we do not need to configure it)
- Router ID: 172.16.0.1
As you see, we use different AS numbers for the routers, so this is an eBGP (or external BGP) session. Again, more on that in a bit. We also use the loopback address of the router as the router ID. This is common practice and makes it easier for you to see, which router your prefixes originate from.
Now, let’s get our hands dirty and configure the routers. Here are the commands:
On PE1:

[edit]
master@PE1.mpl# set protocols bgp group peering type external

[edit]
master@PE1.mpl# set protocols bgp group peering local-as 65000

[edit]
master@PE1.mpl# set protocols bgp group peering peer-as 65001

[edit]
master@PE1.mpl# set protocols bgp group peering neighbor 10.255.255.26

[edit]
master@PE1.mpl# set protocols bgp group peering family inet unicast

[edit]
master@PE1.mpl# set routing-options router-id 172.16.1.1
On P1:
[edit]
master@P1.mpl# set protocols bgp group peering type external
[edit]
master@P1.mpl# set protocols bgp group peering local-as 65001
[edit]
master@P1.mpl# set protocols bgp group peering peer-as 65000
[edit]
master@P1.mpl# set protocols bgp group peering neighbor 10.255.255.25
[edit]
master@P1.mpl# set protocols bgp group peering family inet unicast
[edit]
master@P1.mpl# set routing-options router-id 172.16.0.1So let’s quickly run over each line:
- We specify that the peering will be of type eBGP (on Juniper, you need to specifically define it).
- We set our local AS number.
- We set our peers AS number.
- We define the address of the neighbor, with which we will peer. As we only know the addresses of our /30 transfer network, we will use those.
- We define that we want to interchange IPv4 unicast routes only.
- We define the router ID.
As you might see, we needed to define a group for this configuration. I called mine ‘peering’, but you can name it whatever you like.
Alright, now we will commit the configuration. You can check your sessions by issueing the following command:
master@PE1.mpl> show bgp summary
Threading mode: BGP I/O
Default eBGP mode: advertise - accept, receive - accept
Groups: 1 Peers: 1 Down peers: 0
Table          Tot Paths  Act Paths Suppressed    History Damp State    Pending
inet.0
                       0          0          0          0          0          0
Peer                     AS      InPkt     OutPkt    OutQ   Flaps Last Up/Dwn State|#Active/Received/Accepted/Damped...
10.255.255.26         65001          3          2       0       0           4 Establ
Please not, that it might take up to a minute for the routers to establish the connection. If not, please check your configuration for typos and make sure all the interfaces are up.
So, we have a valid BGP session. What next? If you issue the ‘show route protocol bgp’ command, you will see that there are no routes exchanged over BGP. So we need to change that and let the routers send some update messages.
Routing Policies
Now, a lot of people are scared about routing policies, but this is one of the most powerful freatures of BGP. We use routing policies to determine what routes are exchanged with our peers.
BGP has one golden rule: Export nothing and import everything (in regards to routes). So without any further cofngiuration, no prefixes will be exported (or sent to the peer) but every prefix will be imported (or accepted from the peer). In order to get some routes exchanged, we need to define an export policy.
For the start, we will make it really simple. We create a policy, that will export all routes from interface lo0.0.
[edit]
master@PE1.mpl# set policy-options policy-statement export-bgp term 1 from interface lo0.0

[edit]
master@PE1.mpl# set policy-options policy-statement export-bgp term 1 then accept
Routing policies in JunOS are term based. Terms are evaluated from top to bottom. In our case, we only need one term. We define the from criterium, so all routes originating from interface lo0.0. And in the then statement, we want to accept thos routes. This policy allows all routes from the interface lo0.0 to be announced to our BGP peer. But to make this possible, we need to specify this policy for our BGP session:
[edit]
master@PE1.mpl# set protocols bgp group peering export export-bgp
You can now commit these changes and make them on the other router as well. Now let’s check our BGP summary.
master@P1.mpl> show bgp summary
Threading mode: BGP I/O
Default eBGP mode: advertise - accept, receive - accept
Groups: 1 Peers: 1 Down peers: 0
Table          Tot Paths  Act Paths Suppressed    History Damp State    Pending
inet.0
                       1          1          0          0          0          0
Peer                     AS      InPkt     OutPkt    OutQ   Flaps Last Up/Dwn State|#Active/Received/Accepted/Damped...
10.255.255.25         65000         17         16       0       0        6:33 Establ
  inet.0: 1/1/1/0
As you can see, we now have an additional line talking about the inet.0 routing table. It says something about 1/1/1/0, which means the following: 1 route active from the peer, 1 route received from the peer, 1 route accepted from the peer and 0 routes damped from the peer. BGP has some logic, that upon receiving of a route, determines whether this route is valid (so it will either be accepted or not) and if this route can become the active route. If we check our routing table, we can also see the route in action:
master@P1.mpl> show route protocol bgp

inet.0: 13 destinations, 13 routes (13 active, 0 holddown, 0 hidden)
+ = Active Route, - = Last Active, * = Both

172.16.1.1/32      *[BGP/170] 00:00:06, localpref 100
                      AS path: 65000 I, validation-state: unverified
                    >  to 10.255.255.25 via xe-0/0/3.0

iso.0: 1 destinations, 1 routes (1 active, 0 holddown, 0 hidden)

mpls.0: 6 destinations, 6 routes (6 active, 0 holddown, 0 hidden)

inet6.0: 15 destinations, 15 routes (15 active, 0 holddown, 0 hidden)
Let’s quickly zoom in one the route.
master@P1.mpl> show route protocol bgp 172.16.1.1/32 detail

inet.0: 13 destinations, 13 routes (13 active, 0 holddown, 0 hidden)
172.16.1.1/32 (1 entry, 1 announced)
        *BGP    Preference: 170/-101
                Next hop type: Router, Next hop index: 613
                Address: 0xc3a539c
                Next-hop reference count: 2
                Source: 10.255.255.25
                Next hop: 10.255.255.25 via xe-0/0/3.0, selected
                Session Id: 0x146
                State: <Active Ext>
                Peer AS: 65000
                Age: 5:58
                Validation State: unverified
                Task: BGP_65000_65001.10.255.255.25
                Announcement bits (1): 0-KRT
                AS path: 65000 I
                Accepted
                Localpref: 100
                Router ID: 172.16.1.1
                Thread: junos-main
I highlighted some parts of the route. Let me explain what they are doing:
- Route Preference: If we have the same route from different routing protocols, the route from the protocol with the lowest preference will be installed into the routing table. 170 is the default value for BGP routes.
- Source: This is the address of the BGP neighbor, from which the route stems. In the case of our eBGP session, it is also the
- Next hop: the very next hop the packet need to go to in order to reach the destination.
- State: Active signals that the route is actively installed in the routing table; Ext signals that it is received via an eBGP session
- Peer AS: The AS that originates the route. PE1 is associated with AS 65000
- AS path: This is where the power of BGP comes into play. The AS path is a list of ASes, you need to traverse in order to reach your destination. It is always read from left to right, so you need to go to AS 6500 and then you are already there.
- Localpref: this attribute is very useful for iBGP routes. If you have the same BGP route from different neighbors inside your iBGP feed, you can specify a lower localpref than 100 (the default) for preferred routes.
- Router ID: the router ID of the router originating the route.
The difference between iBGP and eBGP
Okay, so we configured an eBGP session, but there are also iBGP sessions, as I already told you. So what exactly is the difference?
In iBGP session, your local and peer AS are the same number, indicating that you are speaking BGP internally in your AS (hence the name). This results in a very special set of rules that are applied, to prevent loops from being formed. There are three rules:
- Prefixes received via eBGP are forwarded to other eBGP neighbors.
- Prefixes received via eBGP are forwarded to iBGP neighbors.
- Prefixes received via iBGP are never forwarded to iBGP neighbors.
But why is that exactly? It has to do with the AS-path attribute. When you forward an eBGP prefix, it has already an AS number in the AS path. If the prefix somehow gets back to the originating router, it sees its own AS in the path and will discard the prefix. This way, no loops will be formed. In an iBGP scenario, participating neighbors have the same AS number so they would either need to ignore it in the path, this way a loop can be formed, or discard the prefix, because they cannot fully rule out a loop.
Another difference in iBGP vs. eBGP is the way the localpref attribute is handled. In eBGP session, the localpref is always set to 100, whereas in iBGP sessions, it is unchanged from the value set by an import rule.
The last big difference is next-hop handling. In iBGP, the next-hop of a route is unchanged. This means, that a router needs to have a valid route to the next-hop, in order to use the route. If this is not the case, the route is useless and therefore discarded. For eBGP sessions, the next-hop is always set to the routers peering address, before the route is sent out to the neigbor.
Creating a mesh
Alright, now lets configure some redundancy, or a mesh, so to say.

We want to create a little bit of redundancy, so in the case the link between P1 and PE1 breaks, we can still reach PE1s loopback from P1 over P3 and the other way around. So firstly, let’s create a similar session as before between PE1 and P3. P3 will receive the AS number 65002, but other than that, the configuration is more or less the same:
[edit]
master@P3.mpl# set routing-options router-id 172.16.0.3

[edit]
master@P3.mpl# set protocols bgp group peering type external

[edit]
master@P3.mpl# set protocols bgp group peering local-as 65002

[edit]
master@P3.mpl# set protocols bgp group peering peer-as 65000

[edit]
master@P3.mpl# set protocols bgp group peering neighbor 10.255.255.29

[edit]
master@P3.mpl# set protocols bgp group peering family inet unicast

[edit]
master@P3.mpl# set protocols bgp group peering export export-bgp

[edit]
master@P3.mpl# set policy-options policy-statement export-bgp term 1 from interface lo0.0

[edit]
master@P3.mpl# set policy-options policy-statement export-bgp term 1 then accept
On PE1, we will do something slightly different, in order to save some configuration.
[edit]
master@PE1.mpl# delete protocols bgp group peering peer-as

[edit]
master@PE1.mpl# set protocols bgp group peering neighbor 10.255.255.26 peer-as 65001

[edit]
master@PE1.mpl# set protocols bgp group peering neighbor 10.255.255.30 peer-as 65002
Instead of creating another BGP group with merely the same settings, we delete the peer-as statement from the group and specify it for the neighbor 10.255.255.26 (P1). We then simply add another neighbor (P3) with its interface address. After committing and waiting for a short amount of time, we should see the P3 loopback address on PE1.
master@PE1.mpl> show route protocol bgp

inet.0: 10 destinations, 10 routes (10 active, 0 holddown, 0 hidden)
+ = Active Route, - = Last Active, * = Both

172.16.0.1/32      *[BGP/170] 00:00:02, localpref 100
                      AS path: 65001 I, validation-state: unverified
                    >  to 10.255.255.26 via xe-0/0/3.0
172.16.0.3/32      *[BGP/170] 00:00:59, localpref 100
                      AS path: 65002 I, validation-state: unverified
                    >  to 10.255.255.30 via xe-0/0/4.0

iso.0: 1 destinations, 1 routes (1 active, 0 holddown, 0 hidden)

mpls.0: 6 destinations, 6 routes (6 active, 0 holddown, 0 hidden)

inet6.0: 9 destinations, 9 routes (9 active, 0 holddown, 0 hidden)
As you can see, we have both loopback addresses (P1 and P3) via BGP, each with a different AS path. Now, what we want to do, is to create a backup path to PE1 via from P1 via P3 and from P3 via P1. For this, we create another BGP group on P1 and P3 and let them talk to each other.
[edit]
master@P1.mpl# set protocols bgp group backup type external

[edit]
master@P1.mpl# set protocols bgp group backup local-as 65001

[edit]
master@P1.mpl# set protocols bgp group backup peer-as 65002

[edit]
master@P1.mpl# set protocols bgp group backup neighbor 10.255.255.10

[edit]
master@P1.mpl# set protocols bgp group backup family inet unicast
The configuration for P3 is almost identical, only the AS number are swapped and the neighbor address is slightly different. If we check the BGP summary, we also notice something interesting:
master@PE1.mpl> show show bgp summary
Threading mode: BGP I/O
Default eBGP mode: advertise - accept, receive - accept
Groups: 2 Peers: 2 Down peers: 0
Table          Tot Paths  Act Paths Suppressed    History Damp State    Pending
inet.0
                       3          2          0          0          0          0
Peer                     AS      InPkt     OutPkt    OutQ   Flaps Last Up/Dwn State|#Active/Received/Accepted/Damped...
10.255.255.10         65002          5          4       0       0           1 Establ
  inet.0: 0/1/1/0
10.255.255.25         65000        100         98       0       0       43:00 Establ
  inet.0: 2/2/2/0
Not only is the new session established, but we also have some new numbers for the inet.0 table.
- Peer 10.255.255.25 (PE1) now gives us two routes instead of one. Maybe you can guess what the additional route is?
- Peer 10.255.255.10 (P3) gives us one route, however, it is not active.
To solve the mistery, let’s look at the routing table:
master@P1.mpl> show route protocol bgp

inet.0: 14 destinations, 15 routes (14 active, 0 holddown, 0 hidden)
+ = Active Route, - = Last Active, * = Both

172.16.0.3/32      *[BGP/170] 00:09:03, localpref 100
                      AS path: 65000 65002 I, validation-state: unverified
                    >  to 10.255.255.25 via xe-0/0/3.0
172.16.1.1/32      *[BGP/170] 00:41:30, localpref 100
                      AS path: 65000 I, validation-state: unverified
                    >  to 10.255.255.25 via xe-0/0/3.0
                    [BGP/170] 00:05:01, localpref 100
                      AS path: 65002 65000 I, validation-state: unverified
                    >  to 10.255.255.10 via xe-0/0/1.0
Alright, mystery solved. We receive the loopback address from P3 (172.16.0.3/32) from PE1. You can see this via the AS patch, which starts with 65000, the AS of PE1, as well as the next-hop address of 10.255.255.25, which is also the address of PE1.
We also see for prefix 172.16.1.1, that there are two candidate routes. The first one is the direct route to PE1 (check the AS/next hop), the second one is through P3 (again, check the AS/next hop). So what would happen, if we loose direct connectivity to PE1? Let’s cut the wire and check the routing table:
master@P1.mpl> show route protocol bgp

inet.0: 12 destinations, 12 routes (12 active, 0 holddown, 0 hidden)
+ = Active Route, - = Last Active, * = Both

172.16.1.1/32      *[BGP/170] 00:07:47, localpref 100
                      AS path: 65002 65000 I, validation-state: unverified
                    >  to 10.255.255.10 via xe-0/0/1.0
As you might have guessed, the BGP session to PE1 stops and all routes from PE1 are discarded. But we still receive the route from P3 and it is now the active route.
One disadvanteage of the current configuration is, that we can reach P3 from P1 only via PE1 and vice-versa. This might not be desirable but can easily be fixed. Remember the BGP session between P1 and P3? We just need to add the ‘export-bgp’ routing policy to the session on both routers and we will see them exchanging their loopback addresses:
[edit]
master@P1.mpl# set protocols bgp group backup export export-bgp

...

[edit]
master@P3.mpl# set protocols bgp group backup export export-bgp
Now check the routing table:
master@P1.mpl> show route protocol bgp

inet.0: 13 destinations, 13 routes (13 active, 0 holddown, 0 hidden)
+ = Active Route, - = Last Active, * = Both

172.16.0.3/32      *[BGP/170] 00:00:23, localpref 100
                      AS path: 65002 I, validation-state: unverified
                    >  to 10.255.255.10 via xe-0/0/1.0
172.16.1.1/32      *[BGP/170] 00:10:41, localpref 100
                      AS path: 65002 65000 I, validation-state: unverified
                    >  to 10.255.255.10 via xe-0/0/1.0
As you can see, we receive the 172.16.0.3/32 prefix directly from P3. If we now re-plug the wire between PE1 and P1, the full routing table will look something like this:
master@P1.mpl> show route protocol bgp

inet.0: 14 destinations, 16 routes (14 active, 0 holddown, 0 hidden)
+ = Active Route, - = Last Active, * = Both

172.16.0.3/32      *[BGP/170] 00:01:49, localpref 100
                      AS path: 65002 I, validation-state: unverified
                    >  to 10.255.255.10 via xe-0/0/1.0
                    [BGP/170] 00:00:35, localpref 100
                      AS path: 65000 65002 I, validation-state: unverified
                    >  to 10.255.255.25 via xe-0/0/3.0
172.16.1.1/32      *[BGP/170] 00:00:35, localpref 100
                      AS path: 65000 I, validation-state: unverified
                    >  to 10.255.255.25 via xe-0/0/3.0
                    [BGP/170] 00:12:07, localpref 100
                      AS path: 65002 65000 I, validation-state: unverified
                    >  to 10.255.255.10 via xe-0/0/1.0
Scratching the surface
Alright, you built your very first BGP sessions and saw, how routes are exchanged. But this just barely scratches the surface and we will get into a lot more detail later on in future posts. I hope you already learned something. If not, feel free to ask any question in the comment section. BGP is not the simplest of them topics and even I had some troubles in the beginning
That said, until next time!